
So you’ve got your Sony ZV-E10 and want to start taking good photos, In this post, we’ll go through the best settings for different types of photography, and where on the camera you need to go to change them.
The first thing you’ll need to do is make sure you’re in Photography mode, this is changed by pressing the mode button on the top of the camera. This is important as some settings and button function change depending on the selected mode.
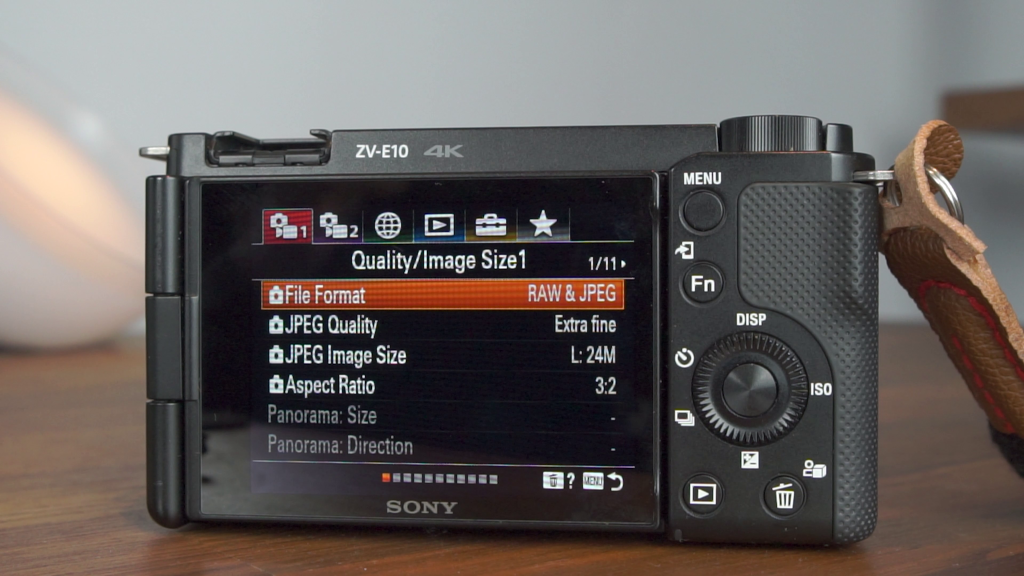
File Format
Then lets check the file format settings are set to the best quality. Press the menu button the back of the camera
Quality/Image Size1 > File Format
Here I use RAW & JPEG, which will save two copies of every photo you take. One in both RAW and JPEG format.
RAW images generally are larger files with more color data stored. Be aware that they don’t open on all editing software. JPEGs are smaller but store less image information, but will open with anything and are smaller files.
If you’re editing your shots in Lightroom or something similar go for JPEG and raw, for quick edits and you want to save space you can just go for JPEG here.
For more info on the differences check out my in-depth video about the formats here.
On the same Quality/Image Size1 menu use JPEG quality Extra Fine and JPEG image size of L 24m and aspect ratio of 3:2. You can set these lower if you’re desperate to save space, but memory cards aren’t that expensive to the best quality is the way to go. With these settings, you’re using as much of the camera’s sensor as possible.
Shoot Modes
The next important setting is to use the correct Shoot Mode, and this will depend on the type of photography you’re taking. By pressing the center button on the back of the camera you get the shoot modes menu. Which gives you a handy description, of each.
For portrait, I’d recommend using Aperture Priority mode which is the A option. This allows you to control the camera aperture. This is the F-number at the bottom of the screen. A low F number will give you a brighter shot with out-of-focus backgrounds, which can help portraits look professional by keeping the subject the center of focus.
You change the aperture either by turning the function wheel or the larger wheel on the top of the camera’s body.
If you want all of your shots in focus then adjust the aperture to a higher F number, which will slowly bring more of the shot in focus as you increase the number. This can be great for landscapes or any shot where you want more of your shot in focus.
A feature of the ZV-E10 is the Background Defocus button which will quickly swap between out-of-focus and in-focus backgrounds if you don’t have time to manually change the aperture.
Next, we’re going to talk about the Shutter priority Shoot mode. Which is the S option, which controls how quickly your camera will take a photo. This is an important setting for two main reasons, first if you want to shoot a moving subject such as a person running, and don’t want the photo to be blurry. And second to brighten or darken your shots.
By increasing the shutter speed the camera takes the photo quicker with less motion blur, but by doing this there is less time for light to hit the sensor so your image will be darker. Fast shutter speeds work well outdoors in good light, so can work well for capturing sports or wildlife without blurring. Whereas slow shutter speeds are useful when the light is low and your subject isn’t going to be moving. Just be aware that hand movements will shake the camera which is very noticeable when using slower shutter speeds.
So that’s some of the more important fundamentals, Now we’ll talk through some of the settings in the Fn function menu. These are available in the menus as well, but this is the quickest way in. Press the Fn button on the back of the camera to access it.
Buy the Sony ZV-E10 on Amazon*
Drive Mode
This is where you select single phot, timer, or burst shooting. Burst shooting will take multiple shots as you hold down the shutter button, very useful when capturing a moving subject.
Focus Mode
This setting defines autofocus behavior. As a quick rule, AF-C is used for photographing moving subjects. AF-S means single shot and is used for a subject that is stationary. AF-A is where the camera decides whether the subject is moving or not and tries to alternate between the servo and single shot mode accordingly.
For an in-depth video about this check out this video where I go through these settings in more detail.
Focus Area
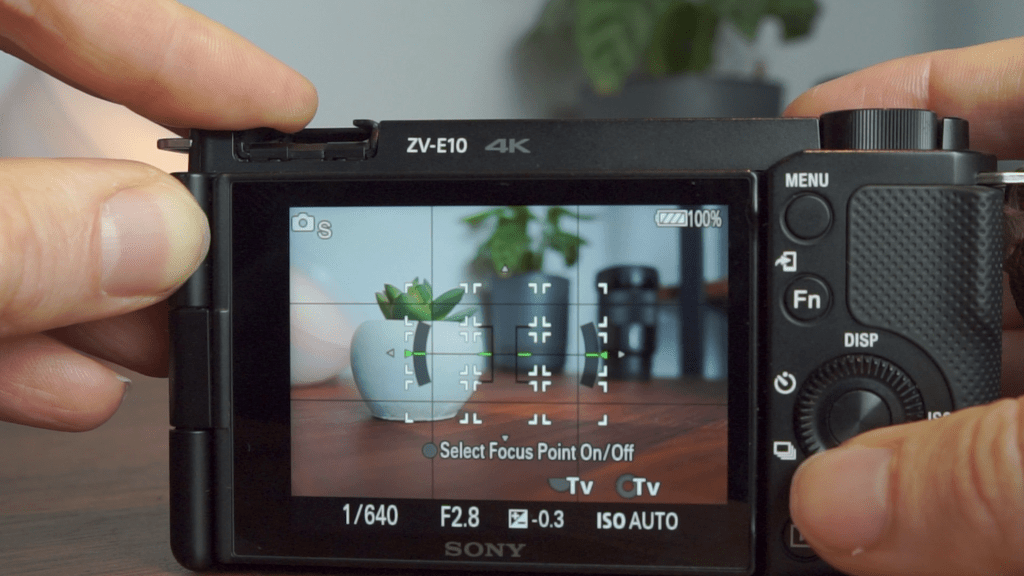
Whilst this setting makes a difference I’d recommend
Wide:
To focus automatically on a subject in all ranges of the image.
When you press the shutter button halfway down in still image shooting mode, a green frame is displayed around the area that is in focus.
Center:
To Focus automatically on a subject in the center of the image. When used together with the AF lock function, you can compose the image you want.
There are more options here to explore, and if you’d like me to make a video about this, let me know in the comments!
Exposure Comp
Exposure compensation basically helps you override automatic exposure adjustments your camera makes in situations with uneven light distribution. Generally I’d keep to small adjustments here, and I quite often leave this setting on -0.3 which helps fight overexposure without making your shot too dark.
ISO
Controls the amount of artificial light added to your shots. Low ISO will give you clear darker shots, increasing the ISO will make your shots brighter but increases noise and grain. On the ZV-E10 generally, the auto setting works well.
Soft Skin Effect
Softens skin for portraits and removes blemishes, I’d highly recommend turning this off. Your shots will lose way too much detail and is just a gimmick in my opinion.
White Balance
Is a complicated subject. White balance is used to adjust colors to match the color of the light source so that white objects appear white. Generally, the auto white balance is very good on this camera, but if you’re noticing the whites looking way off, the presets such as sunlight if your whites are bright are worth remembering. But 90% of the time auto should be ok.
Creative Style
This function allows you to control the finish of the image according to the scene or your intention, these can give you a good base finish for your JPEG photos, and RAWs won’t be affected. Portrait for portrait and landscape for landscape, but I don’t think this is worth spending too much time on.
Picture Profile
Honestly, these shouldn’t be used for photography, whilst they can add a lot of dynamic range to video Don’t use it for photos. Shoot photos in RAW it has WAY more dynamic range in the highlights and shadows than any of the video picture profiles.
Then Shoot mode again
So that was a lot to take in, but understanding these settings will help enhance your photography. There is a lot more I could have included, but this should be a start to getting you confident with your ZV-E10.
Are there any settings you like to use for photography let me know!
Buy the Sony ZV-E10 on Amazon*
DISCLAIMER: This post contains affiliate links, which means that if you click on one of the product links, I’ll receive a small commission. There is no additional cost to you.
